

JBL SOUNDBAR
Content selector
& Player update
JBL Soundbar Update Q3 2025
We will update the JBL Soundbar Display with new content (A) and check the functionality of the installation (B). If necessary, the installation will be adjusted and the content update will be carried out.
To select the correct content package, follow the 4-step plan. Record the outcome of each step.
A. Content Selection – Step-by-Step Guide
- Step 1: Check the hardware setup
- Step 2: Check the display variants (soundbar configuration)
- Step 3: Select the desired language
Note: The eight supported languages and their corresponding codes are:
EN, NL, DE, FR, IT, ES, PT, PL
Once completed, you will know exactly which file is required to correctly update the system.
- Step 4: Download the indicated file to a USB drive
B. System Check & Player Update
To ensure proper system functionality, we perform two checks:
- Hardware check – Verifying the soundbar functionalities
- Player update – Installing the selected content from section A
Additionally, a separate section called ‘Expert Settings’ is available for technical specialists, offering advanced configuration options.

A. Content Selection – Step-by-Step Plan
Step 1:
Check the Installed hardware setup
Determine which hardware setup was used for the installation you want to update, based on the image below,
and note the configuration letter: A, B, or C.
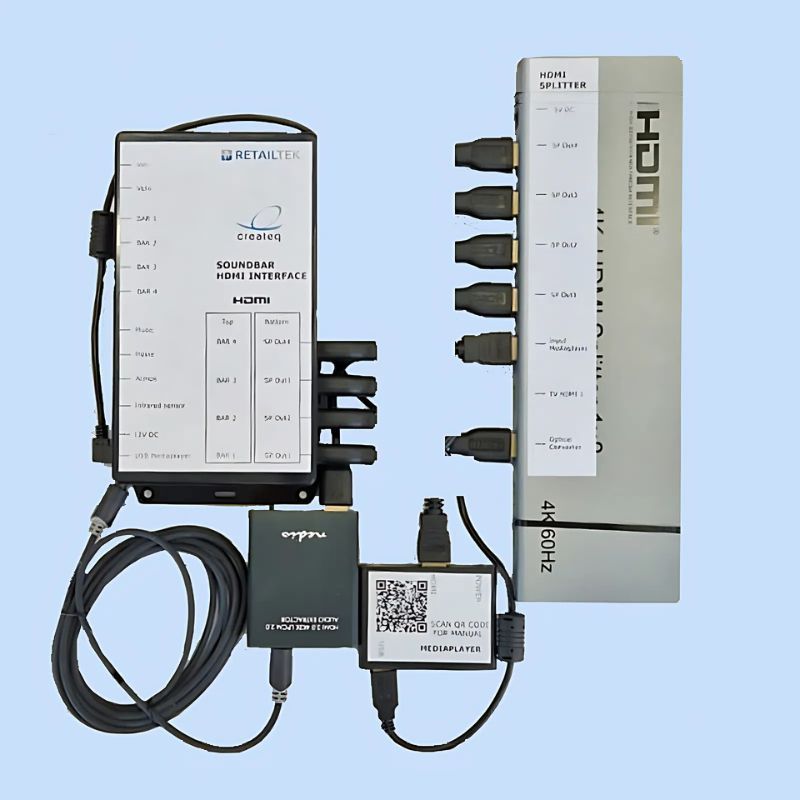
Hardware Configuration: A (Currys Only)
- HDMI IN Interface
- HDMI Splitter
- Media Player (1st generation 4K)
- Nedis Optical Converter
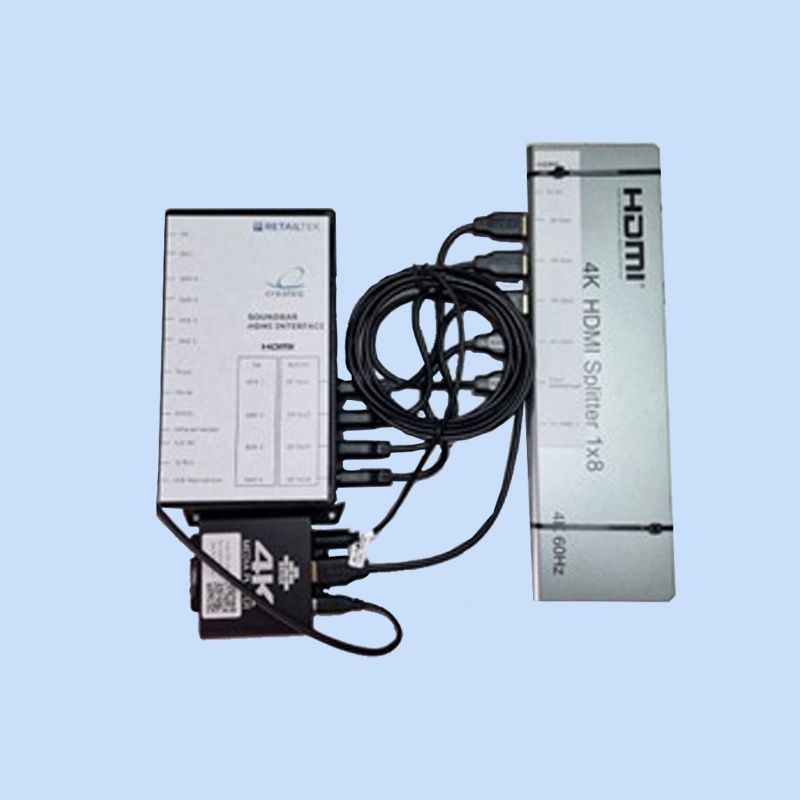
Hardware Configuration: B
- HDMI IN Interface
- HDMI Splitter
- 4K Media Player
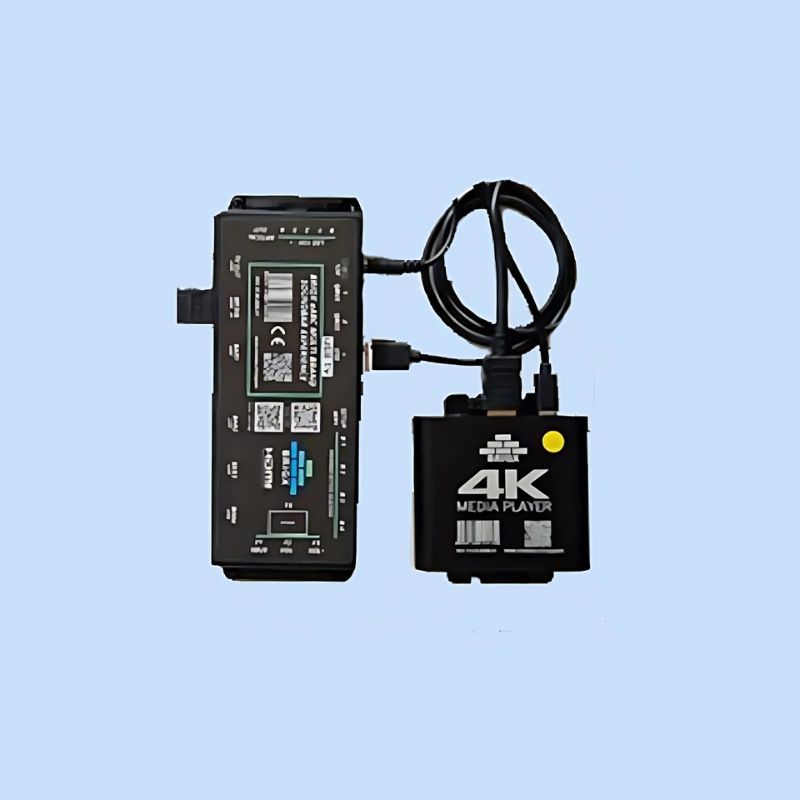
Hardware Configuration: C
- BRIQX eARC Soundbar Experience
- 4K Media Player
Step 2:
Check the needed configuration on the displays
Determine which code applies based on the configurations below and make a note of it.
| Code (Config) | 2.0 MKII | 2.1 MKII | 300MK2 | 500MK2 | 800MK2 | 1000MK2 | 1300MK2 |
|---|---|---|---|---|---|---|---|
| 01 | YES | YES | YES | YES | |||
| 06 | YES | YES | YES | YES | |||
| 07 | YES | YES | YES | YES | |||
| 08 | YES | YES | YES | YES | |||
| 11 | YES | YES | YES | YES |
Step 3:
Select the desired language
Select the language based on the options below. If no specific version is available for a language, the default English version will be used. In that case,
'_E' will be added to the language code.


Step 4:
Download the indicated file to a USB-drive
B. System Check & Player Update
1. Hardware Functionality Check
HARDWARE FUNCTIONALITY CHECK
Before performing the update, we will first check the current setup using the existing content. Please follow the steps below:
1. HDMI Connection and Video Playback
Check whether the HDMI cable is properly connected to HDMI port 1 on the TV. Is the video playing on the TV in idle mode?
2. Check Soundbars
Ensure all four connected soundbars are powered and switched on.
3. Orange Button Control Panel
Check if the buttons on the orange control panel are slowly fading in and out.
4. Soundbar Selection and Playback
Select each of the four soundbars one by one by pressing the corresponding button. Check if:
• The matching product video starts playing on the TV.
• Audio is coming from the selected soundbar.
Note: For hardware versions A and B, audio will initially play through the TV for a few seconds before switching to the soundbar.
5. Test Volume Control
Use the volume up and down buttons on the orange control panel to test each selected soundbar. Check if the volume increases or decreases on the soundbar display, and if this matches what you hear.
6. Check Subwoofers
Verify that the associated subwoofers are also producing sound.
7. Test the Three Playback Buttons: Atmos, Movie, and Music
Press each button and check whether the appropriate content is played.
• Atmos content will only play on soundbars configured for it (see Extended Settings).
• If a soundbar is not assigned, a message will appear on screen and alternative content will play.
Once all checks have been completed and any issues resolved, proceed with replacing the soundbars if necessary.
-------------------------------------
Check the Tips & Tricks section for help with troubleshooting any issues.
-------------------------------------
REPLACING THE SOUNDBARS (IF NEEDED)
Dismounting and Mounting
Remove the current soundbars and install the new lineup on the POS display.
Maintain the original layout as much as possible (e.g. replace BAR1000 with BAR1000MK2, BAR800 with BAR800MK2, etc.).
✔️ Tip: Replace the soundbars one by one, per position, to avoid incorrect placement.
HDMI Cable Connection
Use the same HDMI input as the previous setup — note that this may differ depending on the hardware version:
• Hardware A → HDMI IN
• Hardware B → HDMI IN
• Hardware C → HDMI ARC/eARC
ACTIVATING DEMO MODE ON SOUNDBARS
Models: BAR1300MK2, BAR1000MK2, BAR800MK2, BAR500MK2, BAR300MK2
Method 1A – using the remote control:
1. Press and hold the ATMOS button until the LED on top of the soundbar flashes purple twice.
2. Within 15 seconds, press and hold the MOMENTS (heart) button for 10 seconds.
3. “DEMO” will appear on the display, and the soundbar will automatically start in DEMO mode.
Method 1B– via soundbar:
1. Unplug the power cord from the soundbar.
2. Press and hold both Volume Up and Volume Down buttons on the soundbar while reconnecting the power cord.
3. Continue holding until “DEMO” appears on the display.
Models: BAR2.0MK2 and BAR2.1MK2
Method 2 – via soundbar:
1. Ensure the soundbar is powered on and fully booted.
2. Press and hold the Power and Volume Up buttons for at least 15 seconds.
3. On the BAR2.1MK2, “DEMO” will appear on the display; on the BAR2.0MK2, the LED bar will light up blue.
4. Unplug the power cord, wait 10 seconds, and plug it back in.
2. Player Update

PLAYER UPDATE
After downloading the correct content package and replacing and preparing the soundbars, we will now update the media player in the setup with new content.
Steps:
1. Extract the zip file. The zip file contains a folder named autoplay, which includes all the content for the update.
Copy this entire folder (including all subfiles and folders) to an empty USB stick.
Make sure to safely eject the USB stick to ensure all files have been fully copied.
2. Power on the demo setup and wait until it has fully booted. The system is ready once a video starts playing on the connected TV.
3. Insert the USB stick into the USB-A port of the 4K media player.
⚠️ Note: For hardware version A, the USB cable must first be removed from the media player.
4. After a few seconds, the automatic update process will begin. A progress bar will appear on the TV showing the status of the content file transfer.
5. After a few minutes, the update will be complete. The progress bar will disappear, and a video will start playing automatically.
6. Now remove the USB stick from the media player.
⚠️ Don’t forget this step!
Specifically for hardware version A: Reconnect the previously removed USB cable to the USB port of the media player.
7. Disconnect the power supply from the demo system by unplugging it from the outlet. Wait 10 seconds, then plug it back in.
8. The system will now reboot automatically.
9. Allow the system to fully restart. Depending on the hardware version, this may take approximately 3.5 minutes.
10. Once the buttons on the orange control panel start fading in and out again, the demo set is ready for use.
11. Now perform the hardware check again (steps 1 to 7 from “Hardware Functionality Check”) to complete the setup and ensure everything is functioning properly.
3. Expert Settings
 Manual Download
EXPERT SETTINGS
⚠️ NOTE: These adjustments require technical knowledge. Depending on the installed hardware version, either a laptop with a USB-A connector and a USB-A male to USB-A male cable, or a smartphone, is required.
Only use these settings if:
• Dolby Atmos has not been assigned to soundbars that support it;
• The audio volume is not set correctly.
In the Expert Settings, the following configurations can be adjusted:
• Configure Dolby Atmos per soundbar;
• Set the default audio volume.
Requirements for Performing the Update
A. For Hardware Versions A and B:
A laptop with a USB-A connector and a USB-A male to USB-A male cable.
(Note: This is not a standard cable!)
B. For Hardware Version C:
A smartphone.
ADJUSTING SETTINGS FOR HARDWARE VERSIONS A & B
A terminal program is required for this procedure, such as PuTTY.
Download and install PuTTY from: [www.putty.org](https://www.putty.org)
-----------------------------------
Installing PuTTY – Step-by-Step:
1. Download and install PuTTY on your laptop.
2. Connect the HDMI interface to the laptop via USB.
3. Open Device Manager in Windows and check under Ports (COM & LPT) which COM port is assigned to the device "CCS USB to UART".
4. Wait for the HDMI interface to fully boot (± 2–3 minutes).
-----------------------------------
HARDWARE VERSION A
1. Connect the HDMI interface to the laptop using the USB cable.
2. Ensure the system is powered on.
3. Use the USB cable that normally connects the interface to the 4K media player.
Remove the USB-A cable from the media player and plug it into the laptop.
HARDWARE VERSION B
1. Connect the interface in the same way as with version A.
2. ⚠️ Note: A USB-A male to USB-A male cable is required for this version.
ADJUSTING SETTINGS VIA PuTTY
(for Hardware Versions A & B)
1. Launch PuTTY.
2. Select Serial as the Connection type.
3. Enter the previously identified COM port under Serial Line (e.g. COM3 or COM4).
4. Click Open — a black window with a green cursor will appear.
5. Type three dollar signs: `$$$`
6. The settings page will open. Maximize the window and press the spacebar once.
Now you can adjust the settings by typing the corresponding letter followed by the new value.
Adjusting Volume:
• [Y] Default Volume: Default value is 20. Adjust as needed.
Dolby Atmos Configuration Per Soundbar Position:
• [A] Atmos available for: Set whether Dolby Atmos is allowed per position. Use `Y` (Yes) or `N` (No).
• [C] Atmos stream allowed on: Dolby Atmos should be allowed on all soundbars. Use `Y` for all four positions.
⚠️ Important: Do not change any other settings. This may disrupt the proper functioning of the demo setup.
7. Settings are saved automatically.
8. Close PuTTY.
Restart the Demo Setup:
• Turn off the power supply
• Reconnect the USB cable to the 4K media player
• Turn the power back on
• Verify the soundbar operation
------------------------------
HARDWARE VERSION C
To adjust the settings, open the Wi-Fi menu on the BRIQX eARC Soundbar Experience. The manual explains how to access this menu — see page 5.
How to configure Dolby Atmos per soundbar
Go to page 9 of the manual, section “Advanced Playlist”.
Playlist F contains the Dolby Atmos files.
Under the option “Excl. bar from Playlist F”, you can exclude specific soundbars from these video files. Select the bar positions you want to exclude.
How to set the default audio volume
Go to page 6 of the manual, section “Shopmode Settings”, to adjust the volume if needed.
Don’t forget to save the changes after adjusting the Dolby Atmos and volume settings.
⚠️ Note: Do not change any other settings, as this may affect the proper operation of the demo setup.
4. Tips & Tricks
TIPS & TRICKS
NO VIDEO DISPLAY ON THE TV
Check if the HDMI cable from the demo setup is connected to HDMI 1 on the TV.
NO AUDIO FROM A SOUNDBAR
1. Make sure the HDMI cable is correctly connected to the appropriate HDMI port on the soundbar.
2. For Hardware Versions A & B: use the HDMI IN port.
3. For Hardware Version C: use the HDMI ARC/eARC port.
4. Verify that the soundbar is in DEMO mode (see instructions in Hardware Functionality Check).
5. Check if the volume buttons on the orange control panel are functioning and controlling the soundbar.
6. If this does not work, check the HDMI cable between the soundbar and the HDMI interface, and replace it if necessary.
ATMOS DEMO TRACKS NOT PLAYING ON ONE OR MORE SOUNDBARS
This may be due to a setting in the Expert Settings. Refer to that section and verify the configuration.
VOLUME TOO HIGH OR TOO LOW AT STARTUP
The default volume can be adjusted in the Expert Settings. Check and modify if needed.
INCORRECT CONTENT ON SELECTED SOUNDBAR
Make sure the soundbars are connected in the correct order.
The standard order from top to bottom is:
BAR 1 = BAR1000MK2
BAR 2 = BAR800MK2
BAR 3 = BAR500MK2
BAR 4 = BAR300MK2
